|
|
|
How to make a seamless texture |
|

|
Making a seamless texture can be one of the trickiest parts of making textures for 3D models. This tutorial shows one of the most common methods of making a texture seamless. This tutorial covers how to make one in Paint.NET or Photoshop. If you are using Paint.NET, make sure you have the MadJik All plugin pack installed.
If you would like this tutorial to include another graphics editor, then send an email to mother3land@gmail.com with the name of the editor.
|
|
|
|
|
1. Creating a new document |
|
|
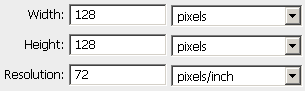
Create a new document of 128x128 and 72 resolution. Seamless textures don’t have to be 128x128, they can be any size. Though, it is recommended for textures on the Nintendo 64 and older systems to have a width and a height that is a power of 2 such as 32x32, 64x64, 128x128, 32x64, 256x512, etc.
|
|
|
|
|
2. Reseting Colors |
|
|
Make sure you have Foreground and Background Colors set to the default black and white. In Photoshop you can do this by pressing (D).
|
|
|
|
|
3. Making a Basic Texture |
|
|
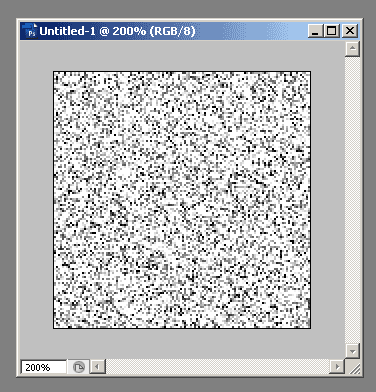
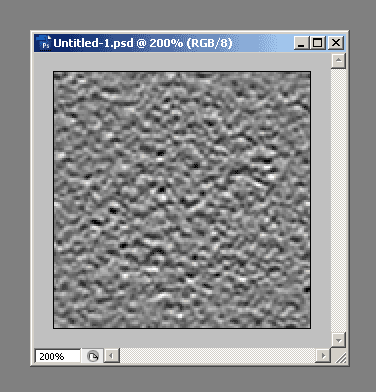
We will make a basic texture to demonstrate. If you’re using Paint.NET select Effects > Noise > Add Noise. Turn the Color Saturation all the way down then set Intensity and Coverage to 100. If you’re using Photoshop, select Filter > Noise > Add Noise. Set Amount to 50%, Distribution to Gaussian and check Monochromatic.
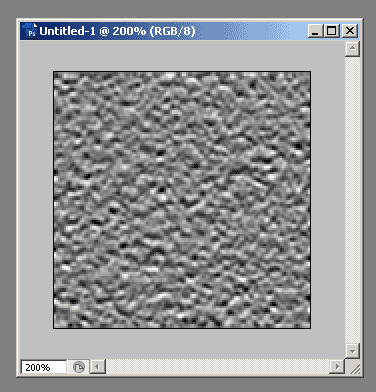
Next, In Paint.NET select Effects > Blurs > Gaussian Blur and set it to 2. In Photoshop select Filter > Blur > Gaussian Blur and set it to 1.
Next, in Paint.NET select Effects > Stylize > Emboss and set Angle to 90. In Photoshop, select Filter > Stylize > Emboss. Set Angle to -90, Height to 1 pixel, and Amount to 400%.
|
|
|
|
|
4. Making It Seamless |
|
|
Now we will make it seamless. In Paint.NET, select Effects > Distort > Paneling and enter half the horizontal width of the canvas and half the vertical width of the canvas for Move Horizontal and Move Vertical respectively. In this tutorial the canvas is 128x128 so we will enter 64 for both. In Photoshop select Filter > Other > Offset. Offset horizontally and vertically by half the canvas size like in Paint.NET. In Photoshop, the Offset filter has a menu called ‘Undefined Areas’. In this menu make sure to select ‘Wrap Around’.
|
|
|
|
|
5. Painting Over The Seams |
|
|
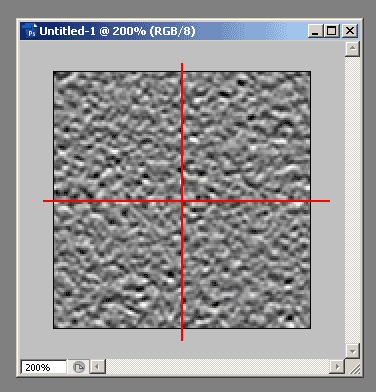
Now you will see two seams through your texture.
Select the Clone Stamp Tool. In Paint.NET the keyboard shortcut for the Clone Stamp Tool is (L). In Photoshop, it’s (S). In Paint.NET, set the Clone Stamp Tool Brush Width to 20 and Hardness to 0. In Photoshop, set the Master Diameter of the brush to 20 and the Hardness to 0. Different types of textures might need a bigger or smaller brush. Experiment to see what size works best for the texture you’re working on. Before continuing, make a copy of your current texture so that you can return to its original state if anything goes wrong during Clone Stamping.
To use the Clone Stamp Tool, Ctrl click (Paint.NET) or Alt click (Photoshop) an area of the texture away from the seams. Doing this samples the area of texture which you clicked and turns it into a brush. Paint over the seams until they are no longer visible. Try to sample from a few different areas of the texture while painting over the seams.
Sometimes the painting done over the seams can stick out from the rest of the texture which is the total opposite of what we want. A way to check if it sticks out is by zooming out the canvas a lot. Having the canvas zoomed out can help you to notice things that you wouldn’t if it were zoomed in.
|
|
|
|
|
6. Finishing It Off |
|
|
After you have finished clone stamping, use Paneling (Paint.Net) or Offset (Photoshop) again with the same settings as before. Now you should have a seamless texture!
|
|
|
|
|